Monday, February 13, 2012

$7 Giveaway - Anthro-Inspired Zinc Letters

I have this thing for DIY (Do It Yourself) projects. I just can't. get. enough. Then along came Pinterest and made my life even more crazy! As if I didn't have a long enough project list already - not to mention binders full of torn out magazine pages!! My list just keeps growing and growing and growing....you get the picture. I guess it keeps a girl on her toes and her mind at work! I know I'm not the only one! Right!?!

Which brings me to this little project.


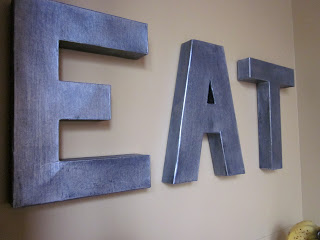
Anthropologie has some very cute zinc letters {very cute indeed}! I found a great tutorial here that walks you through the steps on creating your own and figured I'd give it a shot. I mean, who can't beat the price of $5 for each letter vs. $18 each!?! (note: this is for 8" size letters, mine are 12"!)

Here's how I did it...

Materials:
*foam brush
*bristle brush
*black acrylic paint
*silver metallic acrylic paint
*paper mache letter (found mine at JoAnn's)
*command strips

1. Paint each letter black using your foam brush making sure you get a good even coat and let dry.
2. Take your bristle brush (keep it dry) and brush your silver metallic paint over top of the black. You can put it on as thin or as thick as you like. It all depends on how much of the black you want to show through.
3. Hang them! I recommend Command Strips. No nails needed!

I chose to go with a 12" tall letter. Mainly because my kitchen is really open and thought that anything smaller would just get lost. My main thought was to put them on top of my cupboards - but that didn't look so well. The bottom part of the 'E' couldn't be seen so it looked like 'FAT' - nice, huh!?!

My next location, a vacant area where we are currently missing a cupboard. Looks good, right? Well, it's just not growing on me. I think I want to go smaller than 12" and I can't just throw these out. They are way to cute! This is where you come into play. I'm giving these little darlings away! I only ask that you pay for the shipping. Do you have a room/area they will work in, maybe you could use them as a photography prop, maybe your initials are E A T? ;) I'm sure the possibilites are endless and I'm also sure that once I see where YOU put them I'll be completely and utterly jealous!

Now for the fun part!!

If you are on Pinterest, please do #1 and #2 and then leave a comment here with the links:

1. Pin this post
2. Pin any product from sweetsugarbeet.com

For extra entries:

3. Like The Sweet Sugar Beet on Facebook (or let me know you are already a fan!)
4. Leave a comment here on what your FAV item is from the shop!

You have until Friday, Feb. 17th to enter. I will then select a winner randomly using random.org. REMINDER: this giveaway is not entirely FREE. I am asking that you cover the cost of shipping only. Any overages charged will be reimbursed to you!

Wednesday, January 4, 2012

DIY: fabric covered dresser drawers

I have been slowly cleaning out my sewing room. When I say 'cleaning' it really means making a complete mess! haha. Kind of like what my kids do to the house when I am cleaning. Does a house ever get clean when you have kids!?! I'll get there one day!

With my 'cleaning' I found 3 super large bags/boxes of fabric scraps and immediately started brainstorming what I could do with them. I bought a dresser about 2 years ago at a rummage sale for $12 (I know, a steal!!!). I knew when I bought it that I wanted to do something fun to the inside drawers. My orignal idea was to Mod Podge wrapping paper on the base of them. I mean, who doesn't like to open a draw and see something fun!?! I did that but still wasn't that happy with it. So, alas, that's where the fabric scraps came into play! Here are some step-by-steps on what I did:

Supplies:
*Mod Podge
*Foam Brush
*Dresser Drawer (or any other item of choice!)
*Fabric Scraps

Before you begin, make sure the item you are covering is clean and dry.

Step 1: Gather all of your scraps. I cut some of mine down as I went.

Step 2: Spread some Mod Podge on the surface you are covering. You don't want to cover the entire surface, just the section you are going to lay the piece of fabric on.

Step 3: Lay a piece of fabric down and then go over the top of the piece with another coat of Mod Podge.


Step 4: Repeat #2 and #3, over and over making sure to overlap pieces so that you don't have corners coming up.

That's it!! How easy is that!?! And look at the results! I love it. And I know you won't actually see it once I put things in the drawer, but I know it's there and that's all I need!


Have some fabric scrap DIY projects of your own you want to concure? I have a few scrap bags available in the shop! For details and to purchase, click here. I'd love to see what you come up with! The possibilities are endless!

On a side note... it's been AGES since I blogged. Can you tell!?! Hello, outdated blog! Again... I'll get there one day!

Thursday, February 24, 2011

The Tote Bag!


The other day when I said to my 3 year old daughter that I was going to make her a bag her little eyes lite up like it was Christmas morning. It literally melted my heart! You see until now I've yet to make the girl a bag of her very own! How sad is that!?! It's a little crazy if you think about it. The poor girl is always asking "is that for me mommy?" So I finally made her a tote bag for all of her toys, dolls, books, and whatever else the girl can fit!

The tote is a good size for any age. I made this one with the traditional shorter handles but long handles can be added. It also has a pocket on the inside and a magnetic snap closure.


The totes in my shop come lined with a fusible interfacing that gives them stability and shape and then I add an additional layer of heavy canvas for extra strength.

I'll be adding a slightly larger tote size to the shop soon in the next couple weeks! Lets face it, we always have WAY too much stuff to 'tote' around!

For more details on totes click here.

Love the flower on the bag?? So do I! I purchased this set of felt flowers from Lemon Tree Studio and turned one into a pin! LOVE!
By the way...I think this bag needs a name other than 'tote'....any suggestions!?!

On a side note: I have a serious blogging issue! I just can't seem to keep up with it. That, or the day just isn't long enough!

Friday, January 14, 2011

And the Winner is....

Thank you to everyone who participated in the 1,000 Fan Giveaway!! Random.org selected lucky #41 as the winner for a $30 credit towards anything in the shop! Congratulations Jennifer!! Please email me at info@sweetsugarbeet.com to receive your code for purchase in the shop!

Tuesday, January 11, 2011

1,000 Fans! You ROCK!

One of the great things about running your own business is being able to give away items whenever you want! hehe. I wouldn't be where I am without all of the support of my rockin' fans! THANK YOU for all that you do and for helping me reach my goal of 1,000 Facebook fans!


If you'd like to win yourself a $30 credit towards anything you wish in the shop, here are 8 easy ways you can enter!!!


1. Leave a comment telling me what you would use your $30 credit towards
2. Become a fan on Facebook, or tell me that you already are!
3. Vist my shop and let me know what your favorite item is
4. Post a link to this giveaway on your FB page and tell me you did
5. Follow my blog, or tell me that you already do!
6. Put my shop link on your blog or website (or tell me that it's already there - please leave a link)
7. Add my shop to your Etsy favs
8. Tweet about this giveaway

The winner will be selected randomly using the fabulous random.org. The giveaway ends Thursday, January 13th at midnight EST. I will announce the winner on Friday!

GOOD LUCK and THANK YOU!!!

Tuesday, November 23, 2010

AHHH!!!! The Black Friday Sale!!!!

Due to the lack of a Super Tuesday sale this week...I'm offering one heck of a Super Black Friday sale!

1. Purchase ANY in-stock, ready to ship item and receive the 2nd in-stock item 50% OFF!

2. Purchase ANY Design Your Own/Made to Order item and receive the 2nd DYO/MTO item 25% OFF!


Although Etsy is now allowing coupons the system isn't set up to do offers like this, so you know the drill....submit payment and I will credit you back the discount on your order.

All in-stock items will ship Monday, 11/29. For Design Your Own/MTO, depending on the size of the order, could take 2 weeks to ship. Contact me with any questions!!

Sale is valid on Friday, 11/26 only. Happy Shopping!!!

Tuesday, November 2, 2010

SUPER TUESDAY #2!

It's TUESDAY and you know what that means...time for yet another fabulous deal!! Today only save 15% off your entire purchase!!! That includes EVERYTHING in the shop! Design your own, made to order, market bags...you name it, it's on sale!!

Once payment is received I will issue credit back. Any questions feel free to ask!

Hurry...ends tonight, 11/2 at midnight EST.