
I have this thing for DIY (Do It Yourself) projects. I just can't. get. enough. Then along came Pinterest and made my life even more crazy! As if I didn't have a long enough project list already - not to mention binders full of torn out magazine pages!! My list just keeps growing and growing and growing....you get the picture. I guess it keeps a girl on her toes and her mind at work! I know I'm not the only one! Right!?!
Which brings me to this little project.
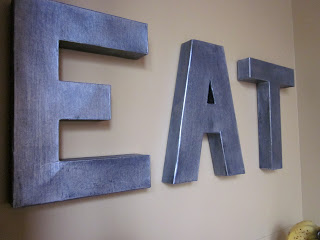
Anthropologie has some very cute zinc letters {very cute indeed}! I found a great tutorial here that walks you through the steps on creating your own and figured I'd give it a shot. I mean, who can't beat the price of $5 for each letter vs. $18 each!?! (note: this is for 8" size letters, mine are 12"!)
Here's how I did it...
Materials:
*foam brush
*bristle brush
*black acrylic paint
*silver metallic acrylic paint
*paper mache letter (found mine at JoAnn's)
*command strips
1. Paint each letter black using your foam brush making sure you get a good even coat and let dry.
2. Take your bristle brush (keep it dry) and brush your silver metallic paint over top of the black. You can put it on as thin or as thick as you like. It all depends on how much of the black you want to show through.
I chose to go with a 12" tall letter. Mainly because my kitchen is really open and thought that anything smaller would just get lost. My main thought was to put them on top of my cupboards - but that didn't look so well. The bottom part of the 'E' couldn't be seen so it looked like 'FAT' - nice, huh!?!

My next location, a vacant area where we are currently missing a cupboard. Looks good, right? Well, it's just not growing on me. I think I want to go smaller than 12" and I can't just throw these out. They are way to cute! This is where you come into play. I'm giving these little darlings away! I only ask that you pay for the shipping. Do you have a room/area they will work in, maybe you could use them as a photography prop, maybe your initials are E A T? ;) I'm sure the possibilites are endless and I'm also sure that once I see where YOU put them I'll be completely and utterly jealous!
Now for the fun part!!
1. Pin this post
2. Pin any product from sweetsugarbeet.com
For extra entries:
3. Like The Sweet Sugar Beet on Facebook (or let me know you are already a fan!)
4. Leave a comment here on what your FAV item is from the shop!
You have until Friday, Feb. 17th to enter. I will then select a winner randomly using random.org. REMINDER: this giveaway is not entirely FREE. I am asking that you cover the cost of shipping only. Any overages charged will be reimbursed to you!


