Wednesday, July 25, 2012

DIY: From Door to Coffee Table


This is BY far one of my favorite handmade pieces in my home!  I honestly can't take full credit for the idea.  I have Pinterest and this post (LOTS of great photos/step-by-step) to thank for the inspiration and 'how-to'.

Silly me, I didn't take any photos of the process; all I have are the before and afters!  I never thought that I would be writing about the steps I took to get the table just the way I wanted but I've had so many people ask about it I thought I'd give it my best and put as much detail as I could into words.

Supplies:
  • Table Saw
  • Power Sander
  • Pocket hole jig
  • Drill with various bits
  • Wood glue
  • Paint
  • Stain
  • Polyurethane
  • Disposable foam brush
  • Old t-shirt (use as a rag)
  • Pocket joint screws
  • Set of 4 casters
  • Pine boards for table base
I first started by hitting up our local Re-Use Center to see if I could find a door that could be easily cut into 3 pieces.  I found the most amazing door - solid oak and heavy-as-all-get-out! $25?  SOLD!

The Process:
1.  I took my hand-held power sander to both sides of the door making sure to remove as much of the polyurethane that was on there as I could.  It didn't have to be perfect; to me, less than perfect is the best! 

2.  Next I needed to figure out just how tall I was going to want this table to be.  I measured our current ottoman and it was about 20" tall.  I then measured the casters and thickness of the board that I purchased for the bottom of the table to make sure that I (my hubs) cut the door side panels to the correct height making sure to account for these additional elements.


*the dark lines indicate the cut lines.  We had some scrap from the legs but this just gives you an idea of how we went about cutting it.

3.  Cutting/Gluing/Drilling - Next we used the table saw to cut the door down to size.  We drilled pocket holes where the side legs met up with the table top, glued the seams, and screwed it together. 

4.  Bottom Base - We measured the opening base of the table and cut 3 boards to size.  To join them together we did an edge joint with pocket hole screws which made the 3 boards look like 1 solid piece.

5.  Casters - We used 4 casters on the bottom of the table.  Use your power drill to screw them into the base of the table.


6.  Here's where the fun part began!  I knew I didn't want this table to be oak but rather something more 'antique' and 'distressed' looking.  I bought a quart of Martha Stewart paint from Home Depot in Milk Pail.  Honestly, for the little amount that I used I could have bought a sample!  I then dry brushed the entire door.  Dry brushing is basically the amount of paint on your brush vs. the speed to which you apply it. I barely dipped the tip of the brush into the paint before I took it to the table.  (if you get too much on your brush you can always wipe a little bit off on a rag before you apply it). The true success of this type of finish depends on the wood NOT being completely covered.  I just took my brush to the table and didn't care if some parts were thicker in paint or not.  I wanted wood to show through!  You don't want your brush really wet/heavy with paint at all!! 

7.  Once the paint was dry it was time to stain.  I wanted to stain the top to both mute the color and also make it look 'antique'.  For this process I used Minwax Wood Finish in Jacobean 2750 and used my foam brush to wipe the stain on.  Just as I put the stain on I pretty much immediately took my old t-shirt rag to it and wiped it off. Pretty simple, huh?  I did this to both the outside and inside of the table. For the bottom base of the table I just stained the entire thing - I like the 2-toned look of it!

8.  After the stain was dry I put on 2 coats of polyurethane (letting the first coat dry and then lightly sanding it with a 220 grit paper before the 2nd coat). 

And there you have it!  In words, how I transformed this old door into a new coffee table (with LOTS of storage) for our living room.  The dry brushing/stain paint techinque is BY FAR the easiest method that I've come up with for making my furniture looked 'antiqued'! 

I hope you were able to get a good idea of how I transformed this door.  Maybe next time I'll do a better job at keeping my camera by my side! ;)

If you're looking for other unique and fun DIY coffee table ideas, check out Top Reveal!


Thursday, July 19, 2012

Put a Name on it!

We are off for a fun-filled weekend of camping with family and friends!  Traveling with 3 little ones is always an interesting adventure.  Seems someone always needs something, is hungry, has to pee, etc, etc, etc.  Well, let's hope that I helped alleviate some of the many 'wants/needs' (mainly caused by boredom!) with their own travel bag full of goodies that THEY packed.

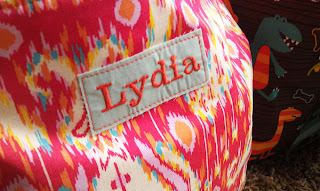
Of course this was something that I thought of last minute and didn't have time to run to the store for supplies so the kids had to work with what I had on hand for fabric.  The boys really wanted Thomas the Train, but alas, settled on the Dinosaurs!  Lydia...totally my child...I couldn't have picked a better fabric combo!  I think they enjoyed the fact that they got to go through all of mommy's things and have something created just for them.  Plus they love the fact that they have their name on them!


I thought that they would be able to fit a few items in the bag that would help distract them from the long drive.  I always knew you could fit a lot in the XL Essential bag...I think Lydia shows just how much.  This girl was bound and determined to get everything she could in hers. 


At one point I heard Owen tell Luke "you take the track, I'll take the tains"!  LOL!  Their obsession with trains is crazy insane.  Good planning though.  I have a feeling I'll be digging up trains all weekend in the sand. :(


I thought the patch on these bags really turned out cute!  I love how they stand out and the fact that they can be added to already made items.


The kids are really enjoying their bags already!  Here's hoping that they work out just as well on the road. 

Need one for your kid, friend, self!?!  There are some pick your own fabric options available in the shop for the XL Essential bag here.  As well as Put Your Name on It embroidered tag options here


Wednesday, July 11, 2012

DIY: Vintage Bracelet

I am absolutely in {love} with the friendship bracelet trend going on right now.  I can remember making braided bracelets on the school bus ride home in elementary school selling them to all my friends for a nickel!  My arm was loaded with them!

Here's the latest bracelet that I've added to my arm!  I love it and it couldn't have been an easier project. 


Here's what you need:
  • Vintage Clip-on Earrings (or any sort of large bead!) - found at thrift stores, rummage sales, Grandma's jewelry box
  • Leather Bracelet ($3.99 at JoAnn Stores)
  • Hot Glue Gun
How easy is that list of supplies!?!

I had this small bowl of clip on earrings now for almost a year that my mom had given to me (she's where I get all my thrifty-ness from!).  I first started by taking the backs off of all the earrings so that they would lay as flat as possible on the bracelet.  Then, I just just hot glued them in place!  Voila!  A new, one-of-a-kind, vintage bracelet!


I must admit that I wasn't sure how well the earrings would say adhered with the hot glue.  I wear the bracelet at least 3 times a week and it takes quite a beating!  I'm happy to say that not one has fallen off!

Give it a try!  I've seen some really neat large beads carried at local art/craft stores - any bead will work!

Here's mine along with all my other favs!


pictured top to bottom: vintage bracelet (me!), rhinestone bracelet (gift from a friend), Orange bracelet (me!), braided bracelet with my kids' initials (JessicaNDesigns)


Don't forget - you can still get 20% off EVERYTHING in the shop until 7/15.  Code: FBFAN at checkout.

Monday, July 9, 2012

I'm back Etsy!

You may have noticed that my store front looks a little different that it has the last few months.  That's because I'm excited to say that I'm back to listing my items on Etsy!  A few months ago I made a decision to move over to Big Cartel.  I didn't put a lot of thought into it...I just did it.  Mainly because that seems to be 'how I roll' and because at the time it seemed to make sense.  They had a monthly fee program vs. a per item listing charge plus a transaction fee which was taking quite a bit of my monthly earnings.  So I made the switch and neglected my Etsy shop along the way because, lets be honest, who can keep up with 2 shops, 3 kids, laundry, errands, and everything else it takes to run a household and business! 

Looking back I kind of regret it a bit.  Things were going well for me and Etsy has always done a fantastic job at allowing customers to 'find' me.  One area I don't seem to focus enough of my efforts on is external advertising; which I know I was lacking while being on Big Cartel.  So....long story short.  I'm back!!

You won't 'technically' notice any difference - whether you go to www.sweetsugarbeet.etsy.com or www.sweetsugarbeet.com, they both will link you to the same shop!  So you don't have to worry about making sure you're going to the right place or not. 

A new thing Etsy has launched - you can pay with credit card vs. having it take you to PayPal.  Nice, huh!?!

So, because you have been so patient with me with all my ups, downs, sideways, etc.  you can enjoy 20% OFF this entire week off anything that's currently in the shop. A few of my new bags are not listed yet - but are certainly available for purchase.  Enter code: FBFAN at checkout and the amount will be deducted.  Offer ends at midnight on 7/15.

I still have new items in the works along with Design Your Own listings to post once I rally up all your fabric options!  One of my FAV parts of the job!

And because I can't have a post with no picture, you can get a complete essential bag set in the shop now!

Enjoy and THANK YOU!